The August 2009 Daring Bakers' challenge was hosted by Angela of A Spoonful
of Sugar and Lorraine of Not Quite Nigella. They chose the spectacular Dobos
Torte based on a recipe from Rick Rodgers' cookbook Kaffeehaus: Exquisite
Desserts from the Classic Caffés of Vienna, Budapest, and Prague.
This cake was a deceptive challenge. I think the biggest hurdle for me was mental, the cake looks so intimidating. But when broken down into steps, it's laborious but not overwhelming. The cake is delicious. But as much as I like caramel, I was not a fan of the little caramel cake wedges on top -- partly because they did no favors to my braces! And I am not quite sure what texture they were supposed to have turned out... chewy or crackly? Mine were a bit of both, and I felt that they made the cake hard to eat.
The recipe itself is broken into three parts... the cake, the icing and the caramel. I made the icing first, a day ahead... chocolate buttercream. It's very rich, but delicious. The cake wasn't hard, again laborious, baking six layers. Instead of a offset spatula, I used a method I've seen dosa makers use -- I used the base of a rounded cup measure I have to smooth out the batter on the rounds of parchment paper. Hooray for precut papers!
I refrigerated the layers to help with the layering and slathering of buttercream. It's pretty hot out here and the buttercream did not do well outside. the cake layers were sliding here and there. And the wedges kept sliding off. I didn't use any nuts, in the hopes that my daughters might have some.
Thursday 27 August 2009
Daring Bakers August Challenge: Dobos Torte
Wednesday 27 May 2009
Daring Bakers May 2009 Challenge: Raspberry strudel
The May Daring Bakers’ challenge was hosted by Linda of make life sweeter! and Courtney of Coco Cooks. They chose Apple Strudel from the recipe book Kaffeehaus: Exquisite Desserts from the Classic Cafés of Vienna, Budapest and Prague by Rick Rodgers.
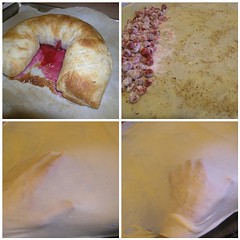
I have to say that I was initially quite hesitant about attempting this challenge. Stretching dough paper thin, in fact even thinner, given my misfortunes with rolling out dough in general, seemed impossible. But my friend and fellow Daring Baker Shirley of What About Second Breakfast? tried the challenge early on. And then she made it again, and again and again. She raved about it and claimed it wasn't so hard. So I had to give it a shot. And she was right!
I would never have imagined it, but once I rolled it out about 15 inches square and began stretching the rest came easily. It practically stretched itself. I do recommend trimming any thick edges, as they tend to turn out a little tough or chewy.
I went with a simple filling of 12 oz raspberries tossed with 1/2 cup sugar. I sprinkled the dough with about 1/3 cup of almond meal, in line with the apple version, which has breadcrumbs.
And you know what, I ended up making the apple version, and a cherry cheese filling from Martha's Baking Handbook. I was planning to take them to work, but my husband pouted, so I left it home. That means I will probably make this again soon to take to work, using all those wonderful cherries California is getting now.
I think this may be in my regular repertoire now. The effort compared to the wow factor is well worth it!

My creation
Type rest of the post here
Strudel dough
from “Kaffeehaus – Exquisite Desserts from the Classic Cafés of Vienna, Budapest and Prague” by Rick Rodgers
1 1/3 cups (200 g) unbleached flour
1/8 teaspoon salt
7 tablespoons (105 ml) water, plus more if needed
2 tablespoons (30 ml) vegetable oil, plus additional for coating the dough
1/2 teaspoon cider vinegar
1. Combine the flour and salt in a stand-mixer fitted with the paddle attachment. Mix the water, oil and vinegar in a measuring cup. Add the water/oil mixture to the flour with the mixer on low speed. You will get a soft dough. Make sure it is not too dry, add a little more water if necessary.
Take the dough out of the mixer. Change to the dough hook. Put the dough ball back in the mixer. Let the dough knead on medium until you get a soft dough ball with a somewhat rough surface.
2. Take the dough out of the mixer and continue kneading by hand on an unfloured work surface. Knead for about 2 minutes. Pick up the dough and throw it down hard onto your working surface occasionally.
Shape the dough into a ball and transfer it to a plate. Oil the top of the dough ball lightly. Cover the ball tightly with plastic wrap. Allow to stand for 30-90 minutes (longer is better).
3. It would be best if you have a work area that you can walk around on all sides like a 36 inch (90 cm) round table or a work surface of 23 x 38 inches (60 x 100 cm). Cover your working area with table cloth, dust it with flour and rub it into the fabric. Put your dough ball in the middle and roll it out as much as you can.
Pick the dough up by holding it by an edge. This way the weight of the dough and gravity can help stretching it as it hangs. Using the back of your hands to gently stretch and pull the dough. You can use your forearms to support it.
4. The dough will become too large to hold. Put it on your work surface. Leave the thicker edge of the dough to hang over the edge of the table. Place your hands underneath the dough and stretch and pull the dough thinner using the backs of your hands. Stretch and pull the dough until it's about 2 feet (60 cm) wide and 3 feet (90 cm) long, it will be tissue-thin by this time. Cut away the thick dough around the edges with scissors. The dough is now ready to be filled.
Don't forget to check out the other Daring Bakers' wonderful creations.
Sunday 1 March 2009
Daring Bakers February Challenge: Chocolate Valentino!
What's challenging about chocolate cake, you say? Well this isn't any old chocolate cake, it's a flour-less chocolate cake... rich and decadent. And part of the challenge is to make your own ice cream to pair with it (believe me, as rich as this cake is, you need ice cream to help it go down!)
So, I've been off the blogging wagon for a while, but I'm hoping with this post I can get back on!
The February 2009 challenge is hosted by Wendy of WMPE's blog and Dharm of Dad ~ Baker & Chef. They've chosen a Chocolate Valentino cake by Chef Wan; a Vanilla Ice Cream recipe from Dharm and a Vanilla Ice Cream recipe from Wendy as the challenge.
Do check out other Daring Bakers amazing takes on this challenge!
Since I was determined to get back on the wagon, I made the cake, though I had no time (or equipment) for the ice cream.
I made the cake in a 6-inch round spring form and saved some of the batter and baked it in these heart-shaped foil cups (ostensibly for jello) that I had found on sale.
The recipe is super easy:
Chocolate Valentino
Preparation Time: 20 minutes 16 ounces (1 pound) (454 grams) of semisweet chocolate, roughly chopped ½ cup (1 stick) plus 2 tablespoons (146 grams total) of unsalted butter 5 large eggs separated 1. Put chocolate and butter in a heatproof bowl and set over a pan of simmering water (the bottom of the bowl should not touch the water) and melt, stirring often. 2. While your chocolate butter mixture is cooling. Butter your pan and line with a parchment circle then butter the parchment. 3. Separate the egg yolks from the egg whites and put into two medium/large bowls. 4. Whip the egg whites in a medium/large grease free bowl until stiff peaks are formed (do not over-whip or the cake will be dry). 5. With the same beater beat the egg yolks together. 6. Add the egg yolks to the cooled chocolate. 7. Fold in 1/3 of the egg whites into the chocolate mixture and follow with remaining 2/3rds. Fold until no white remains without deflating the batter. {link of folding demonstration} 8. Pour batter into prepared pan, the batter should fill the pan 3/4 of the way full, and bake at 375F/190C 9. Bake for 25 minutes until an instant read thermometer reads 140F/60C. Note – If you do not have an instant read thermometer, the top of the cake will look similar to a brownie and a cake tester will appear wet. 10. Cool cake on a rack for 10 minutes then unmold.
If you are so inclined, here is one of the ice cream recipes:
Dharm's Classic Vanilla Ice Cream
Preparation Time: 30 minutes
Recipe comes from the Ice Cream Book by Joanna Farrow and Sara Lewis (tested modifications and notes in parentheses by Dharm)
Ingredients
1 Vanilla Pod (or substitute with vanilla extract)
300ml / ½ pint / 1 ¼ cups Semi Skimmed Milk – in the U.S. this is 2% fat (or use fresh full fat milk that is pasteurised and homogenised {as opposed to canned or powdered}). Dharm used whole milk.
4 large egg yolks
75g / 3oz / 6 tbsp caster sugar {superfine sugar can be achieved in a food processor or use regular granulated sugar}
5ml / 1 tsp corn flour {cornstarch}
300ml / ½ pint / 1 ¼ cups Double Cream (48% butter fat) {in the U.S. heavy cream is 37% fat)
1. Using a small knife slit the vanilla pod lengthways. Pour the milk into a heavy based saucepan, add the vanilla pod and bring to the boil. Remove from heat and leave for 15 minutes to allow the flavours to infuse
Lift the vanilla pod up. Holding it over the pan, scrape the black seeds out of the pod with a small knife so that they fall back into the milk. SET the vanilla pod aside and bring the milk back to the boil.
2. Whisk the egg yolks, sugar and corn-flour in a bowl until the mixture is thick and foamy. 3. Gradually pour in the hot milk, whisking constantly. Return the mixture to the pan and cook over a gentle hear, stirring all the time
4. When the custard thickens and is smooth, pour it back into the bowl. Cool it then chill.
5. By Hand: Whip the cream until it has thickened but still falls from a spoon. Fold it into the custard and pour into a plastic tub or similar freeze-proof container. Freeze for 6 hours or until firm enough to scoop, beating it twice (during the freezing process – to get smoother ice cream or else the ice cream will be icy and coarse)
By Using and Ice Cream Maker: Stir the cream into the custard and churn the mixture until thick (follow instructions on your ice cream maker)
Sunday 4 January 2009
Dubbu's Paneer
