
When I read what the Daring Bakers challenge was for this month was, I mentally said "yeah, right" and thought I'd be sitting this one out, leaving Aamena to do her creative work. But she's tied up in final exams so it fell to me.
The challenge was chosen by lovely hosts Ivonne and Lis, along with co-hosts Fran of Apples Peaches Pumpkin Pie and Shea of Whiskful.
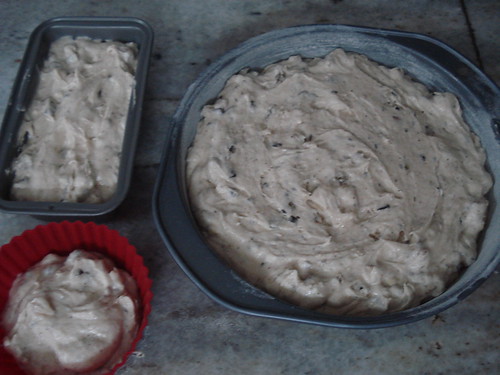
An Opera Cake consists of the joconde - an almond sponge; the syrup, to wet the cake, buttercream, ganache (optional) and a final glaze. I'm not good at complicated things, so I read the recipe about five times, but I only made it today because I was away for a week visiting in-laws. I only got back yesterday, and I was too tired to even think about making even the base. So I had to do everything today. A recipe for disaster, or at least some last minute problems. Like the store being out of blanched almond meal, so you end up using unblanched. And not finding the right size jelly roll tins and not having any two of the same size at home.
A Taste of Light: Opera Cake
Adapted from Dorie Greenspan’s Paris Sweets and Tish Boyle and Timothy Moriarty’s Chocolate Passion.
Joconde
(Note: The joconde can be made up to 1 day in advance and kept wrapped at room temperate)
Ingredients:
6 large egg whites, at room temperature
2 tbsp. (30 grams) granulated sugar
2 cups (225 grams) blanched almond meal
2 cups icing sugar, sifted (220 gm)
6 large eggs
½ cup (70 grams) all-purpose flour
3 tbsp. (1½ ounces; 45 grams) unsalted butter, melted and cooled
1. Divide the oven into thirds by positioning a rack in the upper third of the oven and the lower third of the oven.
2. Preheat the oven to 425◦F. (220◦C).
3. Line two 12½ x 15½- inch (31 x 39-cm) jelly-roll pans with parchment paper and brush with melted butter.
4. Beat the egg whites until they form soft peaks. Add the granulated sugar and beat until stiff and glossy. Set aside.
5. In another bowl, beat the almonds, icing sugar and eggs on medium speed until light and voluminous, about 3 minutes.
6. Add the flour and beat until just combined (do not overmix).
7. Using a rubber spatula, fold the egg white into the almond mixture and then fold in the melted butter. Divide the batter between the pans and spread it evenly.
8. Bake until light brown and springy to the touch, 5 to 9 minutes.
9. Run a sharp knife along the edges of the cakes to loosen. Cover each with a sheet of parchment or wax paper, turn the pans over, and unmold.
10. Peel off the parchment, then turn the paper over and use it to cover the cakes. Let the cakes cool to room temperature.
Syrup
Ingredients:
½ cup (125 grams) water
⅓ cup (65 grams) granulated sugar
1 to 2 tbsp. of a flavoring of your choice (I used lemon zest)
1. Stir all the syrup ingredients together in the saucepan and bring to a boil.
2. Remove from the heat and let cool to room temperature.
Buttercream
Ingredients:
1 cup (100 grams) granulated sugar
¼ cup (60 grams) water
seeds of one vanilla bean or 1 tbsp. pure vanilla extract (I used a vanilla bean paste I found at Surfas)
1 large egg
1 large egg yolk
1¾ sticks (7 ounces; 200 grams) unsalted butter, at room temperature
Flavoring of your choice (I used lemon zest)
1. Combine the sugar, water and vanilla in a small saucepan and warm over medium heat just until the sugar dissolves.
2. Continue to cook, without stirring, until the syrup reaches 225◦F (107◦C) Remove the syrup from the heat.
3. While the syrup is heating, whisk the egg and egg yolk at high speed until pale and foamy.
4. Reduce the mixer speed to low speed and begin very slowly pouring the syrup down the side of the bowl being very careful not to splatter the syrup into the path of the whisk attachment.
5. Raise the speed to medium-high and continue beating until the eggs are thick and satiny and the mixture is cool to the touch (about 5 minutes or so).
6. In a bowl, mash the softened butter in a bowl with a spatula.
7. Add the butter in 2-tablespoon chunks. When all the butter has been added, raise the mixer speed to high and beat until the buttercream is thick and shiny.
8. Add flavouring and beat for an additional minute or so.
9. Refrigerate the buttercream, stirring it often, until it’s set enough (firm enough) to spread when topped with a layer of cake (about 20 minutes).
White chocolate ganache/mousse (this step is optional – I skipped it)
Ingredients:
7 ounces white chocolate
1 cup plus 3 tbsp. heavy cream (35% cream)
1 tbsp. liqueur of your choice (Bailey’s, Amaretto, etc.)
1. Melt the white chocolate and the 3 tbsp. of heavy cream in a small saucepan.
2. Stir and add the tablespoon of liqueur to the chocolate and stir. Set aside to cool completely.
3. In the bowl of a stand mixer, whip the remaining 1 cup of heavy cream until soft peaks form.
4. Gently fold the whipped cream into the cooled chocolate to form a mousse.
5. If it’s too thin, refrigerate it for a bit until it’s spreadable and you're ready to use it.
6. If you’re not going to use it right away, refrigerate until you’re ready to use.
The glaze
(Note: It’s best to make the glaze right when you’re ready to finish the cake.)
Ingredients:
14 ounces white chocolate, coarsely chopped
½ cup heavy cream (35% cream)
1.Melt the white chocolate with the heavy cream. Whisk the mixture gently until smooth.
2.Let cool for 10 minutes and then pour over the chilled cake. Using a long metal cake spatula, smooth out into an even layer.
3.Place the cake into the refrigerator for 30 minutes to set.
Assembling
(Note: The finished cake should be served slightly chilled. It can be kept in the refrigerator for up to 1 day).
Line a baking sheet with parchment or wax paper.
Working with one sheet of cake at a time, cut and trim each sheet so that you have two pieces (from each cake so you’ll have four pieces in total): one 10-inch (25-cm) square and one 10 x 5-inch (25 x 12½-cm) rectangle.
Obviously, I didn't need to to do this, since I used 9-inch round tins.
Step A (if using buttercream only and not making the ganache/mousse):
Moisten a layer of the cake with the flavoured syrup.
Spread about one-third of the buttercream over this layer.
Top with the two rectangular pieces of cake, placing them side by side to form a square, or whatever shape. Moisten these pieces with the flavoured syrup.
Spread another third of the buttercream on the cake and then top with the third square of joconde. Use the remaining syrup to wet the joconde. Spread the remaining buttercream on top of the final layer of joconde and then refrigerate until very firm (at least half an hour).
Make the glaze and after it has cooled, pour/spread it over the top of the chilled cake. Refrigerate the cake again to set the glaze.
Serve the cake slightly chilled. This recipe will yield approximately 20 servings.
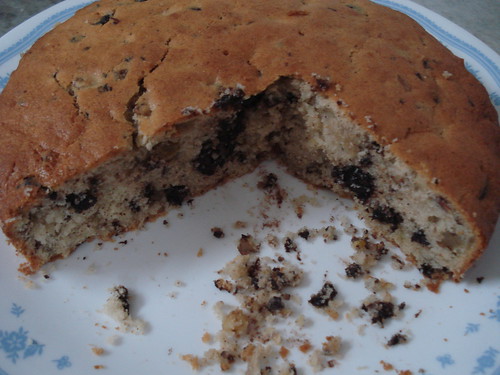
As is clear from the long instructions, this is was quite a challenge. But truthfully each step went quite smoothly. My only problem was was that the buttercream was a bit runny, after I put on the glaze, the top layer of buttercream started to slip a bit. And the layers of joconde are a bit thick, I wish i had had a fourth 9 inch tin to make thinner layers.
Thursday, 29 May 2008
Daring Bakers May Challenge: Opera Cake
Sunday, 18 May 2008
Lemon tea cakes
A friend at work brought on little lemon tea cakes a few weeks ago, and I thought immediately that they'd be great for my daughter's preschool bake sale. She brought in the recipe, and kindly lent me her tea cake pan too. The only change I made was to add baking powder, because I wanted a lighter texture. These little beauties are addictive! My daughters chowed them down like grapes, so though the recipe made 108, yes, that's right 108 cakes, they're really not that much! But I've pared it down by 1/3, to keep it manageable. If you'd like, you can find the original recipe here.
Lemon Tea Cakes
from Taste of Home magazine Feb-March 2002,
a recipe from Charlene Crump of Montgomery, Alabama
Makes six dozen
1 cup butter, softened
1 cup butter, softened
5 1/2 oz cream cheese
1 1/2 cups sugar
4 eggs
2 tbsp lemon juice
11/2 tsp lemon extract
1 tsp lemon zest
2 cups flour (10 oz)
2 tsp baking powder
Preheat oven at 325 degrees, and prepare all the mini muffin tins or tea cake pans you have! I used baking spray with flour. And I only had two 12-cup mini muffin pans and the tea cake mold which makes 30. So I made it in batches, without any problem.
Sift the flour with the baking powder. Cream the butter, cream cheese and sugar until fluffy. Add the eggs one at a time, beating well after each one. Add the lemon juice, lemon and vanilla extracts and lemon zest. Fold in the flour (I found it easier to do a third at a time) until just combined.
Fill mini-muffin tins about two-thirds full (about 1 heaping teaspoon). Bake at 325° for 10-15 minutes or so. Cool for 5 minutes before removing from pans to wire racks.
Meanwhile prepare a glaze: 3 cups confectioner's sugar, 1/4 milk, 2 tsp lemon extract.
When the cakes are cool, dip the tops in the glaze, and let it set for five minutes or so.
Friday, 16 May 2008
Pandan butter cake

I've been wanting to try pandan, sight unseen, ever since I saw this gorgeous jelly dessert a few years ago. All I knew about pandan was that it was related to the delicious kewra essence that is used in north Indian cooking to add a heady, complex aroma to curries or a rose-like flavor to desserts. Kewra is extracted from the flowers of a different screwpine species, whereas pandan uses the leaves.
So I was quite excited to see some pandan extract at a Thai grocery not far from my house, Bangkok Market. I looked for pandan essence too, but unfortunately it was artificial.
Anyway, in the meanwhile I had seen all kinds of complex Malaysian and Indonesian cakes flavored with pandan at various blogs, especially Aunty Yochana's. So I decided my first foray into pandan territory would be a cake. But I didn't want to make the traditional kind that pairs pandan with coconut milk, because i really wanted to taste the pandan. So after some googling, I decided on this recipe from Angie of My Kitchen: My Laboratory.

Pandan butter cake
Anyway, in the meanwhile I had seen all kinds of complex Malaysian and Indonesian cakes flavored with pandan at various blogs, especially Aunty Yochana's. So I decided my first foray into pandan territory would be a cake. But I didn't want to make the traditional kind that pairs pandan with coconut milk, because i really wanted to taste the pandan. So after some googling, I decided on this recipe from Angie of My Kitchen: My Laboratory.

Pandan Butter Cake
adapted from My Kitchen:My Laboratory
2 scant cups cake flour (8oz or 225g)
1 tsp baking powder
½ tsp baking soda
½ tsp salt
6 tbsp butter, softened (3 oz or 85g)
3/4 cup sugar (180g)
2 large eggs, beaten
1 cup nonfat plain yogurt ((240ml) (I used regular)
2 tbsp pandan extract (juice)
¼ tsp pandan essence (lacking this, I added an extra 3tbsp of juice)
1 tsp baking powder
½ tsp baking soda
½ tsp salt
6 tbsp butter, softened (3 oz or 85g)
3/4 cup sugar (180g)
2 large eggs, beaten
1 cup nonfat plain yogurt ((240ml) (I used regular)
2 tbsp pandan extract (juice)
¼ tsp pandan essence (lacking this, I added an extra 3tbsp of juice)
Preheat oven to 350 degree farenheit (180C) and butter a bundt pan or 8”x4” loaf tin. Sift together cake flour, baking powder, baking soda and salt. I didn't have any cake flour on hand, or regular AP, so I microwaved King Arthur unbleached ala the ingenious Kate of A Merrier World. However, I didn't follow the procedure precisely, just did two batches of flour and then weighed the results and substituted a scant 4 tbsp flour with cornstarch.
Combine the yogurt, pandan juice and pandan essence if you're using.
Cream the butter with the sugar and until light. Add the eggs in a slow stream, beating constantly for about 2 mins. Now fold in one-third of the flour mix, beat in half the yogurt and then repeat, ending with the last third of flour.
Bake for about 35 minutes or until a tester comes out clean. Cool in pan for 5 mins. Unmold and cool completely.
Pandan butter cake
So, how did it taste? Well at first when I opened the can, the liquid smelled very grassy and musky and I was shocked that it had barely any resemblance to Kewra. A few tablespoons appeared to do nothing for the batter, and because I didn't have the essence, I added 3 more. The color of the batter barely changed, but I could smell the grassiness and I was getting really nervous!. When it came out, I could barely smell or taste it... I think I was already enveloped in the aroma and unable to distinguish it in the cake. Panicking, I took another 2 tbsp of juice and mixed it with some confectioner's sugar to make about 1/4 cup syrup which I dribbled over the cake, which actually gave it a slightly greener hue.
A few hours later (at work!) I began to feel the flavor coat my mouth and throat, almost as if I'd swallowed a bottle of perfume. It was very unusual, floral, musky, sweet without being heady. When i tried a slice later that night, I was able to appreciate the taste. Though over the next few days I felt that the taste became more muted.
So while it wasn't what I expected, it was delicious, and I plan to try it again soon!
So while it wasn't what I expected, it was delicious, and I plan to try it again soon!
Saturday, 10 May 2008
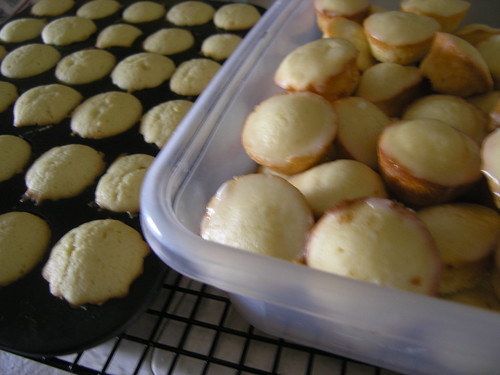
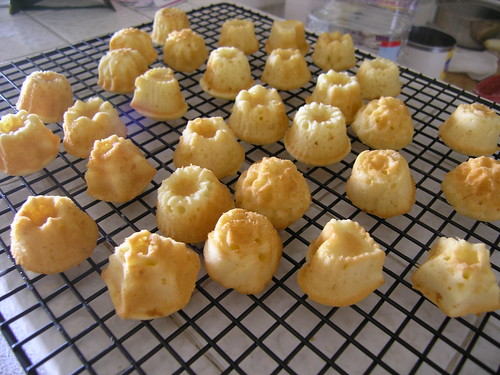
Almond mini cakes

I wanted to bring in something nice to work, using the pretty tea cake pan my friend had lent me. And I also wanted to try the almond paste I had picked up at Surfas a while back. So a little poking around on the web, and I came upon this recipe from Gourmet. It looked easy and delicious. And boy was it. Even my picky daughter loved it.
The recipe is for 12 mini cakes, so I quadrupled it. I got enough for the 30 mini cakes in the mini bundt pan, and 2 mini muffin tins, plus about 4 more (because the mini tea cakes are little smaller than regular mini muffins).
The recipe is for 12 mini cakes, so I quadrupled it. I got enough for the 30 mini cakes in the mini bundt pan, and 2 mini muffin tins, plus about 4 more (because the mini tea cakes are little smaller than regular mini muffins).
Almond Cakes
Adapted from Gourmet
12 tablespoons unsalted butter, softened, plus 1/2 tablespoon, melted
3/4 cup all-purpose flour plus additional for dusting molds
1/2 teaspoon salt
1 cup granulated sugar
8 tablespoons almond paste (not marzipan; 4 oz)
1 teaspoon pure vanilla extract
4 large eggs
1 cup granulated sugar
8 tablespoons almond paste (not marzipan; 4 oz)
1 teaspoon pure vanilla extract
4 large eggs
Confectioners sugar for dusting

Preheat the oven to 350 degrees (180c). Butter and flour the pans (I used baking spray).
Sift the flour and salt together.
Place the butter in a large bowl and cream with the sugar with electric mixer until light and creamy. Beat in the almond paste. I'd recommend crumbling it in with your fingers to prevent lumps). Add the vanilla, and then one egg at a time. Finally add the flour and beat until just combined.
Spoon in to the pans (about 1 tbsp each) and bake for about 15 minutes, until golden at the edges. Transfer to a cooling rack. And dust with confectioner's sugar before serving.
These taste better after an hour or so (or after you've given your nose a break from the almond smell) otherwise they somehow don't taste as almondy. Not that the taste is overpowering. I'd say it's perfect.
Friday, 9 May 2008
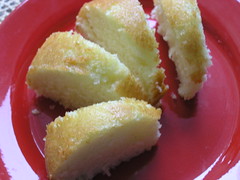
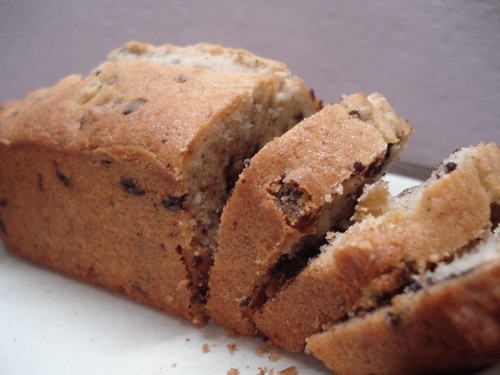
Dundee Cake
Dundee Cake
Adapted from McDougall's Better Baking Handbook
150g butter
150g granulated or soft brown sugar
100g self raising flour
100g plain flour
pinch of salt
1 tsp mixed spice (I use cinnamon and nutmeg)
3 eggs
1 tbsp milk (increase it if the batter seems too dry)
around 2 cups of dark chocolate drops and chopped nuts of your choice,
(I use almonds, currants and walnuts, and chocolate is optional)
1. Grease and line an 18cm round tin. And prepare by creaming method.
2. Place the batter in tin and smooth level it.
3. Bake at 180C for half an hour, then lower it to 150C, bake for a further 10-15 minutes before checking with a toothpick. Take it out when your comes out clean.
I doubled the recipe and the yield was two round cake tins, one big cupcake and one small loaf! Also the original recipe calls for 350g of chopped nuts (no chocolate) and a further 50g of almonds for decor. I don't follow, I just throw in handfuls till I feel the batter looks sufficiently lumpy. Also the original recipe calls for a total of 2 hours and 15 minutes of baking (first 1 hour at 180C and the rest at 150C). Maybe its supposed to be a very dry cake but I could never, for the life of me, do it.
Saturday, 3 May 2008
A little spice

So, for some strange reason, I suddenly began craving Delhi-style choley -- aka chickpeas or garbanzo beans -- with kulchas a leavened flatbread.
Luckily I had a large can of beans in my pantry and made the choley in no time, it was waiting for the kulcha dough to rise a bit that was harder. Nonetheless the wait was worth it. And the best thing, both DDs loved it. Phew.
Spicy choley
1 28 oz can garbanzo beans (drained and rinsed)
1 cup plus 1 tbsp yellow or white onion chopped finely
2 green chile such as a jalapeno or serrano, deseeded and sliced thinly
5 tbsp lemon juice
1 tbsp grated ginger
2 tbsp vegetable oil (such as Canola)
1 1/2 cup chopped tomatoes
1/4 tsp turmeric (optional)
1/2 tsp or less cayenne powder
1 tbsp coriander powder
3/4 tsp salt
1/2 tsp amchur (mango powder) optional
1/2 to 1 tsp garam masala (available in indian stores, substitute below)
3 tbsp cilantro chopped
First, combine 1 tbsp of the chopped onions, 3 tbsp lemon juice, 1 chopped green chile and 1/2 the ginger and 1/4 tsp salt in a small bowl. the mixture will likely turn pink. That's OK! This will give an added layer of flavor to the beans, a trick I picked up from Madhur Jaffrey's Indian Cooking.
In a saucepan or saute pan, heat the oil and add the chile, shake a bit and add the onions, cook on medium-low heat until soft and brown on the edges. Add the tomatoes and remaining ginger cook for about 5 minutes, until the tomatoes are mushy, add the turmeric, coriander and cayenne and cook for another 3 minutes, then add the drained garbanzo beans and 1/ cup water and 1/2 tsp salt. Bring to a simmer, cover and cook for about five minutes. Now add the amchur if using and the garam masala and lemon juice. Let the flavors meld for a minute or so, check and adjust seasoning to taste and then stir in half the cilantro and half the onion relish. Remove to a serving dish and garnish with the remaining cilantro and relish. Serve hot. You can eat it plain, with rice or any bread. Truly versatile. And it tastes even better the next day.
Kulchas
1 cup chapati flour (sold as Aata, durum wheat in indian stores, or substitute white wholewheat)
1 cup unbleached AP flour
1/2 tsp active yeast
1/4 cup warm water
1 tsp sugar
1/3 cup yogurt
2 tbsp soft butter for brushing
Stir in the sugar and yeast into the warm water in a large bowl and let it rest 5 minutes. When bubbling add the flours and then stir in the yogurt. The flour should come together in a rough dough, add a little water to get a soft pliable dough, knead five or six times. Cover with plastic wrap and let it rise for 2 hours, till it increases by half. Knead the dough and divide it into about 10-12 balls. Heat a frying pan or flat griddle, cast iron is great. Keep it on medium heat. Working one by one, roll out a ball to about 6 inch diameter and place on the hot griddle.

Flip within 30 seconds (as soon as you see the color change), when you start seeing bubbles of air, flip it again and use a small dishcloth to push on the kulcha to make it puff up. Brush both sides with butter and remove to a plate or other container. repeat 11 times!

Flip within 30 seconds (as soon as you see the color change), when you start seeing bubbles of air, flip it again and use a small dishcloth to push on the kulcha to make it puff up. Brush both sides with butter and remove to a plate or other container. repeat 11 times!
I'm no expert, but I do try to roll out another kulcha after doing the first flip on the preceding kulcha. But be careful, you don't want them to burn.
Once you're done, wrap it in foil or place in an insulated dish to keep warm. You can freeze them while still warm and just heat on a griddle.

Cheesecake cupcakes
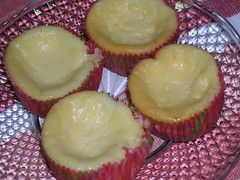
Well out of my cheesecake pop near-debacle have emerged these cute cheesecake cupcakes, inspired by the good folks at Cooking for Engineers. If you may recall, I was left with a liquidy center, which I saved, added one egg and some leftover white chocolate frosting (!) and baked. They were a huge success, even though I wish I had taken them out maybe 15 minutes earlier.
Subscribe to:
Posts (Atom)